How to Create a Translation Glossary
A translation glossary helps you increase the accuracy of machine translation outputs by allowing users to specify how a specific term or phrase should be translated.
- The glossary works best with one to three word phrases.
- The term in the source language column will need to match exactly what is delivered by the captioner in order to translate, so adding something like "Initial Public Offering (IPO)" won't translate as it is unlikely the speaker will actually say IPO after Initial Public Offering, so that won't get captioned.
- If you don't want a term to be translated and would like it to remain in English you can add that to the list by adding the English term in both columns.
There are two different ways to add a glossary.
Glossaries created in a specific event are used for that event alone and cannot be saved. Glossaries added at the account level are saved to the account and can be pulled into any upcoming event.
Add a glossary to your Account Settings
When you add a glossary at the account level - Organization Settings, you will be able to apply it to any of your events.
From the Unified dashboard page, click on Live Events & Streaming option to access the SyncWords Live page.
Click the profile icon near the top right of the page and select Account from the dropdown.

Then click the gear icon on the right hand side of your organization name.

You are now on your Organization Settings page. Click the Glossaries tab and tap the blue "plus" button to add a new glossary.

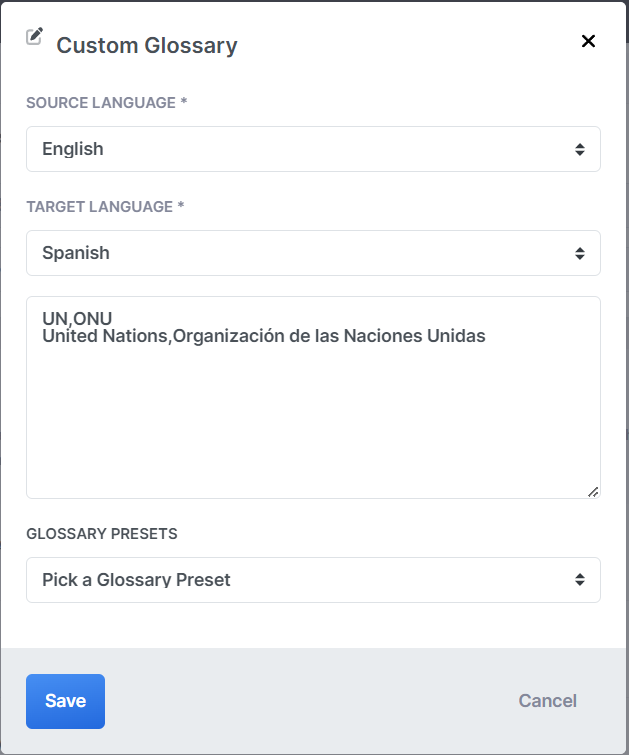
In the modal that pops up give your glossary a name, select the source and output languages and add the translation terms. The format of the terms should be as follows:
term in source language,term in translated language
term2 in source language,term2 in translated language
NOTE: There should be no space between the terms and the comma separating them.
Read more about copy-pasting your glossary here.

Click the "Save" button to save all the changes you have made. You can repeat this process as many times as necessary to add additional glossaries.
Edit your account level glossary by tapping the Edit button in the Glossary menu. You can also duplicate a glossary, by using the "Duplicate" option in the dropdown, or remove the glossary by using the "Delete" option.

Add a glossary to an Event
To add a glossary to a specific event, go to the Translations tab, and tap the "Add a Glossary" button.

In the modal that pops up give your glossary a name, select the source and output languages and add the translation terms. The format of the terms should be as follows:
term in source language,term in translated language
term2 in source language,term2 in translated language
NOTE: There should be no space between the terms and the comma separating them.
Read more about copy-pasting your glossary here.

If you have added a glossary at the Account level you will be able to pick and apply that glossary by using the Glossary Presets dropdown.
Click the "Save" button to save all the changes you have made.
You can add glossaries for different languages but only one glossary per language pair. After you add the glossary, you can edit it or delete it.

NOTE: If you are working with a SyncWords technician and need to provide them with your glossary please use the attached template below.
Importing a Glossary
You can add a glossary directly to SyncWords Live or by formatting it beforehand in a text editor/csv.
If you are formatting it in a text editor or directly on SyncWords Live, ensure you add double quotes (“) around words or phrases that include a comma. This is not needed if you are using a CSV. For example: “Africa,Europe and the Middle East","África,Europa y Oriente Medio". Ensure there’s no space between the source language term and the translation.
If the terms are in a CSV, open the CSV file with a text editor and then copy and paste into SyncWords Live.
If the terms are in a spreadsheet, you can save it as a CSV (UTF-8) and then open the CSV file with a text editor.
The term in the source language column will need to match exactly what is delivered in the source language captions, including the case, i.e., Upper Case or lower case.
NOTE: Terms that include some characters like backslash (/) and double quotes (“) may not work.
Download a Glossary Template