Step 1 - Create a Service
In SyncWords, create a new service or navigate to your existing service configuration. Please see Step 1: General Settings - How do I create a Service using the new UI? for more information.
Step 2 - Provide Input Media
From the Input Media section, select RTMP PUSH. This determines how your live stream is received by the Service for processing. 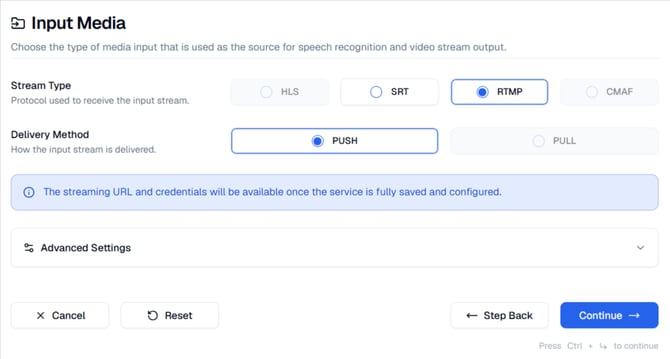
Please see Step 2: Input Media (RTMP) - How do I use RTMP as an Input source for my Service using the new UI? for more information.
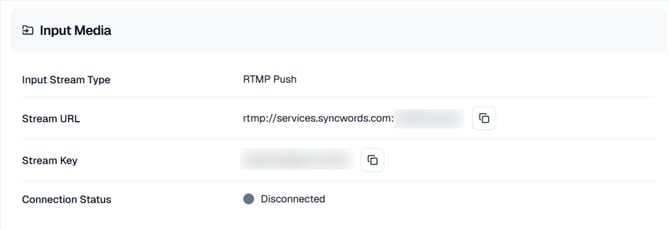
If you already have an existing Service with RTMP selected on the Input, copy the values generated and enter them into your existing live streaming software or service (OBS, Wirecast, Streamyard, etc.) to send your stream to SyncWords.
LinkedIn Video Specifications (Encoder Settings)
Aspect Ratio: Ratio 16:9
Resolution: 1280x720p at 720p (LinkedIn supports 1080p, but recommends streaming at 720p because the player only goes up to 720p)
Frame Rate: 30 fps
Key Frame: Every 2 seconds (60 frames @ 30 fps)
Video Bitrate: 3.5 Mbps
Audio Bitrate: 128 Kbps audio
Audio Sample Rate: 48 KHz sample rate
Encoding: H.264 video, AAC audio
Step 3 - Set up Transcription
Now that we have set up the incoming stream we need to set up the Transcript section to create the captions.
Configure the transcription settings to create captions from your live stream audio.
Please see Step 3: Transcription - How do I enable Transcription for my Service using the new UI? for more information.
Step 4 - Set up Translations (optional)
If you need translations, you can add real-time AI text translations and audio dubbing to your live stream.
Please see Step 4: Translation - How do I enable Translation for my Service using the new UI? for more information.
NOTE: Only one language can be added and it would replace the source language captions.
WARNING: RTMP output only supports languages using Latin character sets, so picking a language like Arabic would not work.
Step 5 - Set up the Output
The last step is to set up the stream that will go out to one or more RTMP endpoints with the embedded 608 captions. In your SyncWords Service configuration, navigate to the Output section select RTMP - PUSH and add at least one destination.
You can now also send multiple RTMP output destinations to stream simultaneously to platforms like YouTube, Facebook, Castr and more. Please see Can I send my RTMP output to multiple destinations? for more information.
NOTE: We will go over where to get those values from LinkedIn below in case you are not familiar with their setup.
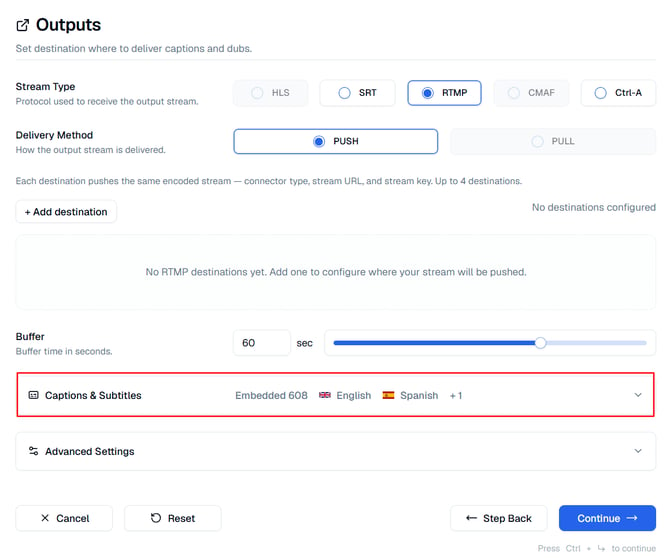
Make sure the "Embedded 608" is enabled under Captions & Subtitles. Make sure to click "Continue" once your selections are set. This moves to the next step where you can preview your Service settings.
Please see Step 5: Output (RTMP) - How do I configure RTMP Output for my Service using the new UI? for more information.
NOTE: Captions will appear at the bottom of the video on LinkedIn, no matter what position you select on SyncWords.
Step 6 - Getting the Stream URL and Key from LinkedIn
-
To get the RTMP Stream URL and Key that you will need to enter into SyncWords, go to https://www.linkedin.com/video/golive/manage/ and find your stream. Then click Prepare to go live. This option is available one hour before your scheduled live event. However, LinkedIn recommends creating the RTMP URL and Stream Key about 10 minutes before you go live.

-
In the Stream settings tab, pick your region from the dropdown. If you don’t see your region, select the region closest to you.
-
Click "Get URL" to generate the Stream URL and Stream Key.

-
Copy the Stream URL and Stream Key and paste them into your SyncWords Service output as the Destination Stream URL and Stream Key.

-
When you start streaming, you will see a preview within the LinkedIn custom stream page. If you can view the preview, the connection to LinkedIn is successful.
-
When you are ready, click Go live in the upper-right corner of your LinkedIn live event.
WARNING: You must start your SyncWords Service in order for it to accept incoming streams and deliver an output.