In this step, you will configure the AI text and audio translation settings for your Service. If you don't need translations, you can skip this step and proceed directly to Step 5 - Output. For a list of all steps see our Service Wizard Steps below.
Add Translation
To begin, click the Add Translation option and select the language you want to add from the dropdown. You can add multiple languages to make your content accessible to a wider audience.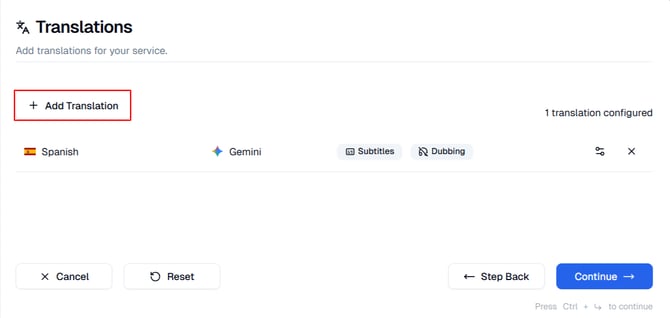
Each translation added will appear in the list with the following details:
- Language - Displays the selected output language for the translation
- Translation Engine - Indicates which AI provider is being used for translation.
Common engines include OpenAI, Google, Amazon, DeepL, Nova, Soniox and Gemini - Output Type - Displays whether the translation will be used for Subtitles or Dubbing. You may enable one or both.
- Settings Icon - Opens translation settings for that language translation. This is where you can change the translation engine and enable dubs.
- Delete (×) - Removes the selected translation from the list.
Translation Settings: Additional configuration options are available in the Translation Settings section. Details about these optional settings are listed below.
NEXT STEP: Once you’ve entered the required information, click "Continue" to move to Step 5: Outputs for HLS, SRT, RTMP or CMAF where you will choose the output for your Service.
Navigation Options
At the bottom of the screen, you will see the following actions:
- Cancel - Cancels the creation of your Service and exits the wizard.
- Reset - Clears all fields and settings in the Wizard so you can start over.
- Step Back - Returns to the previous step if you need to modify earlier settings.
- Continue - Moves to the next step of the wizard once the required fields are completed.
IMPORTANT: Click Continue or Save Changes in order to save your Translation settings and move to the next step.
NOTE: If you click off the Wizard without Resetting or Canceling your inputs will be saved and you can return to complete the setup later.
Your Service is not created until you have been through all 6 steps and clicked the "Create Service" button.
Translation Settings - Subtitles and Dubbing
To access the Translation Settings, click the Settings option. This modal allows you to manage translation-specific settings for AI-generated subtitles and dubbing.

Subtitles
When you select Subtitles in the Translation Settings modal, you can configure how text-based translations are generated and displayed.
Language: This field shows the target translation language you have selected. If multiple variants are available, you can choose the preferred variation for your subtitles.
Translation Engine: Select the AI engine that will generate subtitle translations. Different engines may offer varying accuracy, tone, and context handling.
Glossary: Use the Glossary option to include a predefined set of terms or phrases for translation consistency. You can select an existing glossary or choose Not set to proceed without one. Read more about Glossaries here.
NOTE: Only glossaries that have been created and saved in your account will appear in the dropdown list.
Advanced Settings: Additional configuration options are available in the Advanced Settings section. Details about these optional settings are listed below.
NOTE: The options under Advanced Settings varies depending on the build you have on your account.
Save Subtitle Changes
Once you have configured your subtitle settings:
-
Click Update Translation to save your settings.
-
Click Cancel to exit the modal without saving.
Dubbing
When you select Dubbing in the Translation Settings modal, you can configure how translated audio output is generated.
Enable Dubbing: Toggle Enable Dubbing to turn on AI audio generation for the selected translation language. When enabled, you can configure additional voice and playback options for the dubbed output.
Dubbing Mode: Choose how AI voices are used in your dubbed translation.
There are three available dubbing modes: Single Voice, Dynamic Voice and Cloned Voice.
Single Voice
Select Single Voice to use one consistent AI-generated voice across the entire translated audio track. This option provides a uniform tone where speaker differentiation is not required.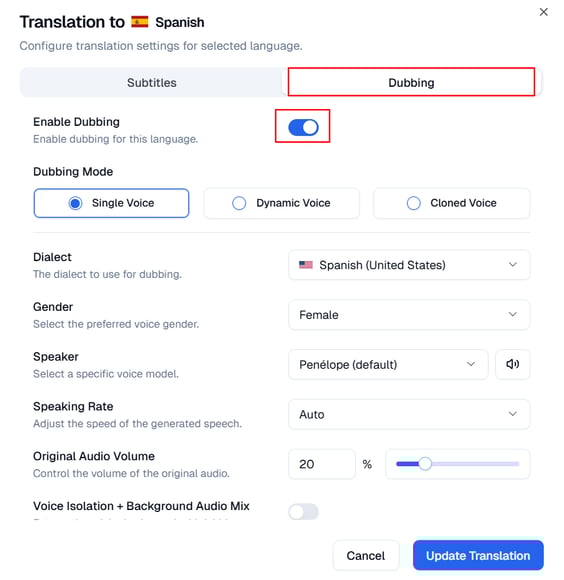
Confirm or change the following five options:
-
Dialect - Select the Dialect that best matches your audience. Some languages will have more than one dialect available.
-
Gender - Select the preferred voice gender for the AI dubbing output.
-
Speaker - Choose a specific voice model for your dubbed translation. Not all languages have more than one option. You can preview available voice samples by clicking the speaker icon next to the voice name.
-
Speaking rate - Set the Speaking Rate to control how fast or slow the AI voice delivers the translation. The default is set to Auto which is a Dynamic Speaking Rate: Automatic detection and syncing of dubbed voices to match the timing of the source language. You can change the speaking rate, lower values speak slower and higher values speak faster.
-
Original Audio Volume - Use this slider to adjust how much of the original audio remains audible in the background. This setting controls the mix ratio between the original audio source and the dubbed track in the final output.
- Voice Isolation + Background Audio Mix: When enabled, this feature separates the original speaker's voice from background sounds (music, ambient noise, sound effects) and overlays only the dubbed voice on top of the preserved background audio. This creates a more natural listening experience by maintaining the original atmosphere while replacing the speech.
Dynamic Voice
The Dynamic Voice mode automates dubbing for multiple speakers in your content. When selected, the system automatically selects the best voice for each speaker, matching tone and gender, for a more natural and engaging listening experience.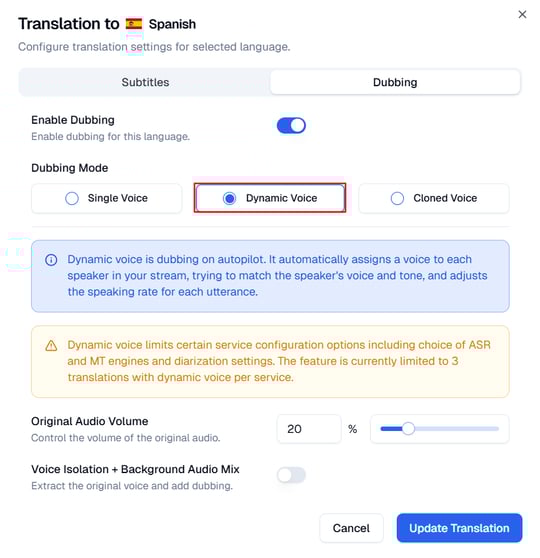
Cloned Voice
The Cloned Voice mode delivers the most natural and lifelike dubbing experience by replicating the tone, emotion, and speaking style of each original speaker in the translated voice. This option is ideal when you want to preserve the character and delivery of the original dialogue while translating it into a different language.

Dialect: Select the regional dialect that best matches your target audience. Available dialects vary by language (e.g., Spanish (Spain), Spanish (Latin America)).
Original Audio Volume: Use the slider to control how much of the original audio remains audible beneath the dubbed track.
-
Set to 0% for dubbed audio only with no original audio
-
Set to 100% to keep the full original audio with dubbed audio layered on top
-
Values in between create a mix of both
Voice Isolation + Background Audio Mix: When enabled, this feature separates the original speaker's voice from background sounds (music, ambient noise, sound effects) and overlays only the dubbed voice on top of the preserved background audio. This creates a more natural listening experience by maintaining the original atmosphere while replacing the speech.
Advanced Settings: Additional configuration options are available in the Advanced Settings section. Details about these optional settings are listed below.
NOTE: The options under Advanced Settings varies depending on the build you have on your account.
Save Dubbing Changes
Once you have configured your dubbing settings:
-
Click Update Translation to save your settings.
-
Click Cancel to exit the modal without saving.
Advanced Settings
Subtitles
To access the Advanced Settings for Subtitles, click the Advanced Settings dropdown within the Subtitles configuration modal. This section provides additional configuration options for fine-tuning subtitle translation behavior and performance.
Extra Prompt: The Extra Prompt field allows you to provide context and guidance that helps the AI translator produce translations that match your specific needs and audience expectations.
Latency Mode: Select the latency mode to control the balance between translation speed and quality. This setting adjusts how quickly translations are produced by trading sentence completeness for lower latency when needed. Available options include: Best quality - Normal, Low latency and Lowest latency.
Compression: Enable this toggle to minimize text expansion when translating to languages that typically use more words than the source language (e.g., Spanish, French, German). Compression paraphrases the translated output to fit within the same time or space constraints as the original content, ensuring subtitles remain readable and properly timed. This helps maintain consistent subtitle length and reading speed across multiple languages.
NOTE: Compression may result in slight paraphrasing of the original meaning to fit space/time constraints.
Dubbing (Single, Dynamic and Cloned Voice)
To access the Advanced Settings for Dubbing, click the Advanced Settings dropdown within the Dubbing configuration modal. This section provides additional configuration options for fine-tuning dubbed audio output.
Single Voice: The following settings are available for Single Voice. These settings are also common to both Dynamic Voice, and Cloned Voice.
Late Utterance Timeout: Enter the timeout duration in seconds to skip utterances that arrive later than the specified threshold. This prevents outdated or delayed audio segments from being spoken if they exceed the acceptable latency window.
NOTE: Increasing this value allows more time for processing complex translations but may result in delayed audio. Decreasing it ensures tighter synchronization but may skip utterances during processing delays.
Rate Strategy: Select the strategy for calculating the Text-to-Speech (TTS) speaking rate. This determines how the system adjusts the speed of the dubbed audio to match timing requirements. Available options include: static and dynamic.
Min Dynamic Rate: Set the lower boundary for the dynamically inferred speaking rate, expressed as a percentage of the default speaking rate. This ensures the dubbed audio never speaks slower than this threshold.
Max Dynamic Rate: Set the upper boundary for the dynamically inferred speaking rate, expressed as a percentage of the default speaking rate. This ensures the dubbed audio never speaks faster than this threshold.
NOTE: The Min and Max Dynamic Rate values create a range within which the system can adjust speaking speed. Wider ranges provide more flexibility for timing adjustments but may result in less natural-sounding speech at the extremes.
Dynamic Voice - Additional Settings: In addition to the common settings under Single Voice, Dynamic Voice mode includes:

Rate: Set the speaking rate as a percentage within the range of 20-200 percent. This value controls the baseline speed at which the dynamic voices will speak.
NOTE: The Rate setting works in conjunction with the Rate Strategy to determine the final speaking speed. Dynamic Voice mode automatically selects appropriate voices for each speaker while maintaining the specified rate.
Cloned Voice - Additional Settings: In addition to the common settings under Single Voice, Cloned Voice mode includes: 
Prompt Boost: Enable this toggle to activate prompt boost, which works harder to clone the original speaker's voice characteristics more accurately. This setting enhances voice similarity at the cost of additional processing time.
NOTE: Prompt Boost improves voice cloning fidelity but may increase latency. Use this when voice authenticity is more important than minimal delay.
Clean Mode: Enable this toggle to activate clean mode, which is more robust to noise in the original audio. This setting helps produce clearer dubbed audio when the source contains background noise, audio artifacts, or lower quality recordings.
Reference Buffer Duration: Set the duration of the per-speaker reference audio buffer in HH:MM:SS.mmm format. This determines how much audio is analyzed to learn each speaker's voice characteristics for cloning.
Rate: Set the speaking rate as a percentage within the range of 20-200 percent. This value controls the baseline speed at which the cloned voices will speak.
Nat Audio Selector
Click to expand the Nat Audio Selector section to configure natural audio track selection and mixing options.

Enable Nat Audio Selector: Toggle this option ON to select a natural audio track to mix together with the dubbed audio track. When enabled, this allows you to blend the original natural audio (such as background music, ambient sounds, or sound effects) with the generated dubbed voice.
NOTE: This feature is useful when you want to preserve background audio elements while replacing only the spoken dialogue with dubbed content.
Audio Track: Enter the index or PID (Program Identifier) of the natural audio track you want to mix with the dubbed audio. This specifies which audio track from your source stream should be used for background audio mixing.
NOTE: The Audio Track field allows you to specify one or more audio tracks to be mixed with the dubbed output. This is particularly useful for preserving music, sound effects, and ambient audio from the original stream.
Service Wizard Steps