During the Input Media step you can select the type of stream that is used as the source for speech recognition and the video stream output. In this step, you will configure HLS as your input media source. This determines how your live stream is received by the Service for processing. For a list of all steps see our Service Wizard Steps below.

Stream Type: Select HLS as your stream type.
Delivery Method: Choose how your input stream will be delivered. You can select between PUSH and PULL.
HLS PUSH
Use this option when your encoder can upload HLS segments directly to a SyncWords provided endpoint. This is less common for HLS but useful in certain workflows.
After selecting HLS Push and completing all wizard steps, the system will generate your streaming URL. Use this URL to configure your encoder to push HLS segments to SyncWords.
IMPORTANT: The streaming URL and credentials will be available after the service setup is complete.

HLS PULL
Use this option when your HLS stream is already published to a CDN, origin server, or streaming platform and SyncWords should fetch it from there. This is the most common HLS configuration.
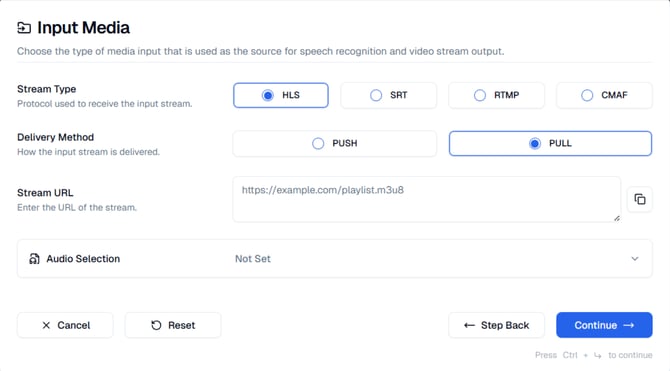
Stream URL: Enter the URL of the HLS stream that SyncWords should pull from. This should be the complete HLS manifest URL typically ending in .m3u8 (e.g. https://example.com/playlist.m3u8)
IMPORTANT: The HLS Pull URL must be publicly accessible or SyncWords will not be able to ingest it. If the stream is behind a firewall or requires authentication, contact support for configuration guidance.
Audio Selection
To access the Audio Selection settings, click the Audio Selection dropdown on the page. This section allows you to specify which audio variant (such as different languages, commentary tracks, or audio quality options) from your HLS stream should be used for transcription and processing.
NOTE: Audio Selection is available for only HLS PULL. HLS PUSH automatically uses the default audio from your stream
Audio Selector Enabled: Toggle this option ON to enable audio variant selection. When disabled, the Service will automatically use the default audio from your input stream.
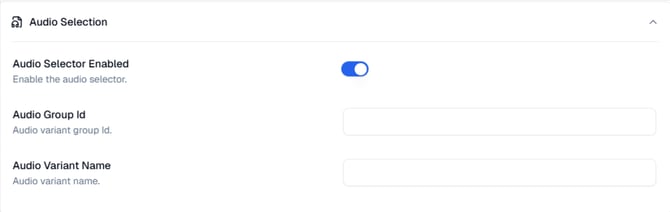
Audio Group Id: Enter the audio variant group ID from your HLS manifest. This field identifies the group of audio variants available in your stream. The Group ID corresponds to the GROUP-ID attribute in the HLS manifest's EXT-X-MEDIA tag.
Audio Variant Name: Enter the audio variant name that should be used for transcription. This field identifies the specific audio variant within the group. The variant name corresponds to the NAME attribute in the HLS manifest's EXT-X-MEDIA tag.
NOTE: These values must match the audio group and variant identifiers in your HLS manifest. Check your HLS manifest file to find the correct Group ID and Variant Name values for your desired audio track. To view your HLS manifest, open the .m3u8 URL in a text editor or browser. Look for lines beginning with #EXT-X-MEDIA to find your audio variants.
NEXT STEP: Once you’ve entered the required information, click "Continue" to move to Step 3: Transcription where you will enable AI Transcription (ASR) for your Service.
Navigation Options
At the bottom of the screen, you will see the following actions:
- Cancel - Cancels the creation of your Service and exits the wizard.
- Reset - Clears all fields and settings in the Wizard so you can start over.
- Step Back - Returns to the previous step if you need to modify earlier settings.
- Continue - Moves to the next step of the wizard once the required fields are completed.
NOTE: If you click off the Wizard without Resetting or Canceling your inputs will be saved and you can return to complete the setup later.
Your Service is not created until you have been through all 6 steps and clicked the "Create Service" button.
Service Wizard Steps