During the Input Media step you can select the type of stream that is used as the source for speech recognition and the video stream output. In this step, you will configure RTMP as your input media source. This determines how your live stream is received by the Service for processing. For a list of all steps see our Service Wizard Steps below.

Stream Type: Select RTMP as your stream type.
Delivery Method: Choose how your input stream will be delivered.
RTMP PUSH
Use this option when your encoder or streaming software will push the live stream directly to SyncWords. This is the most common setup for live streaming workflows using encoders like OBS, vMix, or hardware encoders.
After selecting RTMP Push and completing all wizard steps, the system will generate your Stream URL and stream key. Use these credentials to send your live stream to the platform.
IMPORTANT: The streaming URL and credentials will be available after the service setup is complete.
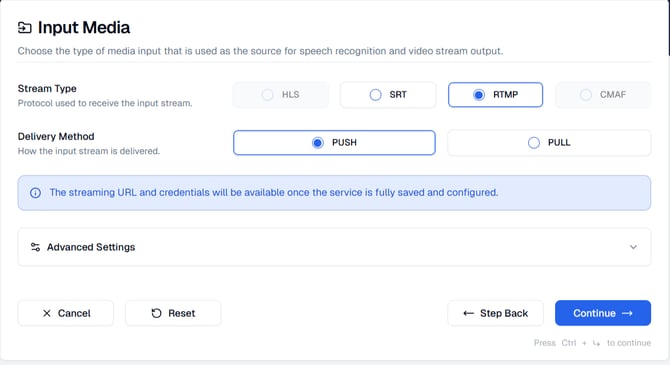
Advanced Settings: Additional configuration options are available in the Advanced Settings section. Details about these optional settings are listed below.
IMPORTANT:
- The audio sample rate of any incoming stream needs to be set to 44.1 kHz
- The frame rate should be 29.97 or 30 fps
- The video bitrate should be set to a minimum of 3,500 Kbps
- The keyframe interval should be set to 2 seconds
- The aspect ratio should be 16x9 or 4x3
Audio Selection
To access the Audio Selection settings, click the Audio Selection dropdown on the page. Use Audio Selection when your input stream contains multiple audio tracks (e.g., different languages, commentary feeds, or isolated audio sources) and you need to specify which track and channels to use for transcription.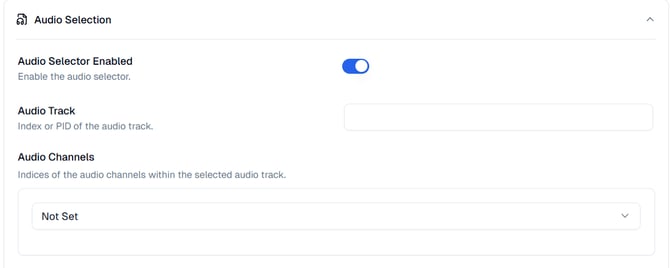
Audio Selector Enabled: Toggle this option ON to enable audio track and channel selection. When disabled, the Service will automatically use the default audio from your input stream.
Audio Track: Enter the audio track you want to use for transcription. This is useful when your input stream contains multiple audio tracks (such as different languages or audio feeds).
TIP: The audio index starts from 1. The track order is determined by the Program Map Table (PMT) in your MPEG transport stream. PIDs should be specified like `PID 255`, `#255`, `PID 0xFF`, or `0xFF`. Default is the first audio track.
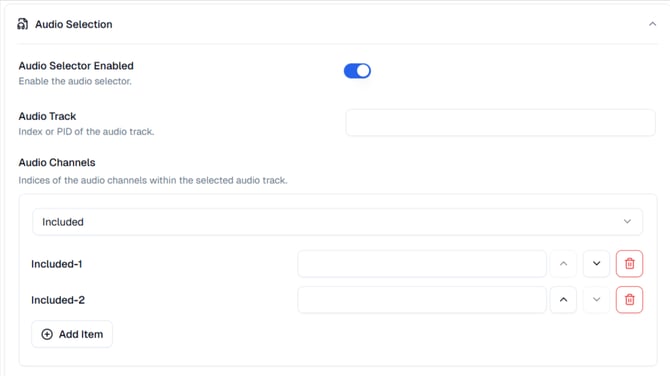
Audio Channels: Select which audio channels within the selected audio track should be used for processing. You can choose from:
-
Not Set - Use the default channel configuration.
-
Included - Opens a channel selector where you can specify one or more channels to include. Click Add Item to add additional channel selections, and use the text field to specify channel indices (starting from 0). Use the delete (trash) icon to remove channel selections. Leave empty to select all channels in the track.
NEXT STEP: Once you’ve entered the required information, click "Continue" to move to Step 3: Transcription where you will enable AI Transcription (ASR) for your Service.
Navigation Options
At the bottom of the screen, you will see the following actions:
- Cancel - Cancels the creation of your Service and exits the wizard.
- Reset - Clears all fields and settings in the Wizard so you can start over.
- Step Back - Returns to the previous step if you need to modify earlier settings.
- Continue - Moves to the next step of the wizard once the required fields are completed.
NOTE: If you click off the Wizard without Resetting or Canceling your inputs will be saved and you can return to complete the setup later.
Your Service is not created until you have been through all 6 steps and clicked the "Create Service" button.
Advanced Settings
To access the Advanced Settings, click the Advanced Settings dropdown on the page. This section provides additional configuration options for fine-tuning your RTMP input stream.

Use TLS: Enable Use TLS to establish an encrypted RTMPS connection. TLS (Transport Layer Security) ensures that your stream data is encrypted during transmission, providing additional security for sensitive content.
NOTE:
- When TLS is enabled, your encoder must be configured to use RTMPS protocol instead of standard RTMP.
- This Advanced Setting option is only available when you select RTMP Push.
Service Wizard Steps